.svg)
Analyzing User Data with Custom AWS Pinpoint Events, Kinesis, Lambda, Eventbridge, Glue, and Athena
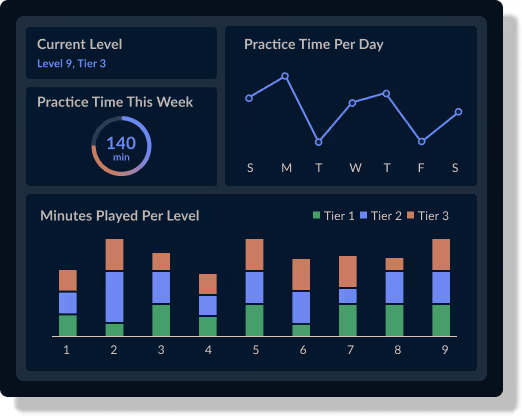
Side note: This pipeline was created for use in a project I’ve been working on with a few friends called Museflow.ai, where we’re trying to combine flow state, gamification, and (eventually) AI to make learning the piano effortless. Feel free to try out the prototype!
If you’re reading this you’re most likely already aware of AWS’s many useful cloud features which make them one of the leading destinations for cloud native applications. AWS’s about page now simply says that they offer “over 200” services, because even they have stopped counting. Today I’ll be focusing on a combination of services which you may or may not have heard of: Pinpoint, Kinesis, Lambda, Eventbridge, Glue, and Athena. That sounds more like a secret pass phrase than a list of technologies, and maybe it is, because together they unlock the ability to analyze your user data as your users interact with your application—or at least I hope.
My goal in writing this will be to put these services together like lego pieces to arrange a data pipeline that pushed events like logins, sign ups, or really any custom event you choose, to a glue table for you to slice and dice with SQL in Athena. From my understanding of how these services interact with one another, it should very well be possible. I’ll be writing this article in 3 parts:
- Architecture Overview
- Pinpoint setup (with Cognito)
- Front end setup (React)
- Data pipeline
- Athena/Glue
I’ll be using a combination of two infrastructure frameworks to accomplish my setup: AWS SAM and Terraform. I prefer SAM for developing serverless applications for how easy it makes development and deployment, and I like Terraform for shared infrastructure. Configuration values can be shared between these two frameworks using Parameter Store. This project will require both as I’ll be developing a serverless data pipeline in addition to some other infrastructure.

Architecture Overview
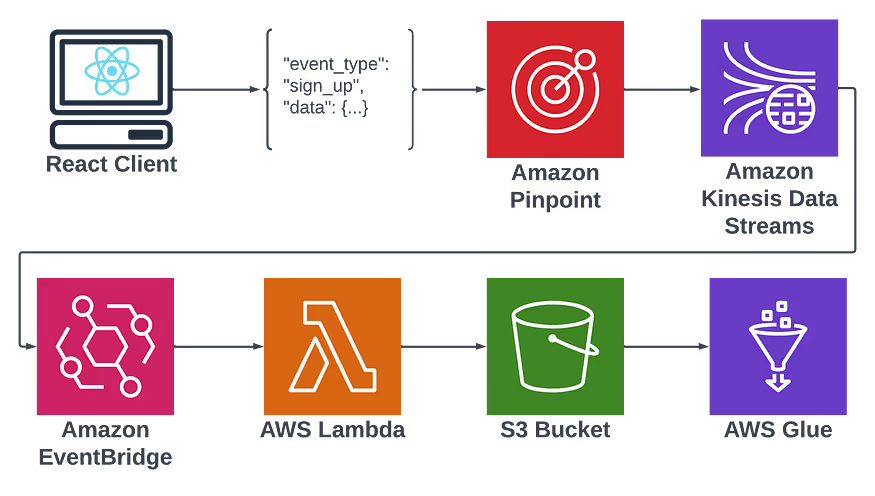
Here’s a quick flow diagram to illustrate the frankenstein of services I will be putting together to achieve this goal:
To quickly walk through the purpose of each service, pinpoint will be used to collect event data. It offers a convenient way to send events from my user’s application to our backend data lake. It offers a plugin connection to Kinesis that I would otherwise have to manually create. Kinesis similarly plugs directly into Eventbridge. Eventbridge acts as a trigger for my Lambda which will map events to correct S3 buckets. The reason I’ll be using different S3 buckets for different events is to provide a separate schema for each. Glue expects all events in an S3 bucket to hold the same schema in order to partition them into a table, which I will then be able to query with SQL using Athena.
AWS Pinpoint Setup
Our first order of business is setting up Pinpoint. Since the project I’m setting this up for is a React project, I’ll be showing my frontend client examples in React. The Pinpoint infrastructure setup will be in Terraform.
Terraform
1resource "aws_pinpoint_app" "pinpoint_app" {
2    name = var.app_name
3}
4
5data "aws_iam_role" "pinpoint_to_event_stream_role" {
6  name = var.pinpoint_role_name
7}
8
9resource "aws_pinpoint_event_stream" "pinpoint_event_stream" {
10  application_id         = aws_pinpoint_app.pinpoint_app.application_id
11  destination_stream_arn = aws_kinesis_stream.event_stream.arn
12  role_arn               = data.aws_iam_role.pinpoint_to_event_stream_role.arn
13}
14
15resource "aws_ssm_parameter" "client_id" {
16    # checkov:skip=CKV2_AWS_34: Does not need to be encrypted
17    name        = "/${var.org_name}/${var.environment}/pinpoint/application_id"
18    description = "Pintpoint application id"
19    type        = "String"
20    value       = aws_pinpoint_app.pinpoint_app.id
21
22    tags = {
23        environment = var.environment
24    }
25}
26
27resource "aws_kinesis_stream" "event_stream" {
28  name             = "${var.app_name}-app-event-stream-${var.environment}"
29  retention_period = 48
30  encryption_type = "KMS"
31  kms_key_id = "alias/aws/kinesis"
32
33  shard_level_metrics = [
34    "IncomingBytes",
35    "OutgoingBytes",
36    "ReadProvisionedThroughputExceeded",
37    "WriteProvisionedThroughputExceeded",
38    "IncomingRecords",
39    "OutgoingRecords",
40    "IteratorAgeMilliseconds"
41  ]
42
43  stream_mode_details {
44    stream_mode = "ON_DEMAND"
45  }
46
47  tags = {
48    Environment = var.environment
49  }
50}
This creates an AWS Pinpoint application and an event stream I can use to send Pinpoint Events. Not in the above snippet is the role by pinpoint to send events to Kinesis. I create all my IAM roles in a different, global Terraform workspace specific to IAM. I use template files which inherit variables like account id from a global variables file, but here’s the JSON template I use:
The assume-role policy:
1{
2	"Version": "2012-10-17",
3	"Statement": [
4        {
5            "Effect": "Allow",
6            "Action": [
7                "sts:AssumeRole"
8            ],
9            "Principal": {
10                "Service": "pinpoint.amazonaws.com"
11            },
12            "Condition": {
13                "StringEquals": {
14                    "aws:SourceAccount":"${ACCOUNT_ID}"
15                }
16            }
17	    }
18    ]
19}
20
and the policy attachment:
1
2{
3	"Version": "2012-10-17",
4	"Statement": [
5      {
6        "Effect": "Allow",
7        "Action": [
8            "kinesis:PutRecords",
9            "kinesis:DescribeStream"
10        ],
11        "Resource": "arn:aws:kinesis:us-west-2:${ACCOUNT_ID}:stream/org-name-app-event-stream-dev"
12      },
13      {
14        "Effect": "Allow",
15        "Action": [
16          "kms:DescribeKey"
17        ],
18        "Resource": [
19          "arn:aws:kms:us-west-2:${ACCOUNT_ID}:key/<kms kinesis key ID>"
20        ]
21      }
22    ]
23}
Now, once I run the Terraform I can see the following in my AWS console when I navigate to https://us-west-2.console.aws.amazon.com/pinpoint/home?region=us-west-2#/apps.

Once you click on the project, the important part is the event stream in settings, which should be enabled.


Now that my event stream is enabled, I can almost start sending events.
Cognito Identity Pool
Before I can start sending events, my front end needs a way to connect to my AWS resources using AWS credentials. To do that, you need a Cognito Identity Pool. Cognito Identity Pools, not to be confused with User Pools, allow one to provide guests and authenticated users with the credentials needed to access AWS resources. They’re provided permissions like anything else in AWS — with an IAM role. However, the assume role permissions is a bit unique. You’ll be specifying a Cognito identity as a federated identity. Here’s what that looks like:
1{
2  "Version": "2012-10-17",
3  "Statement": [
4    {
5      "Effect": "Allow",
6      "Principal": {
7        "Federated": "cognito-identity.amazonaws.com"
8      },
9      "Action": [
10        "sts:AssumeRoleWithWebIdentity",
11        "sts:TagSession"
12      ],
13      "Condition": {
14        "StringEquals": {
15          "cognito-identity.amazonaws.com:aud": [
16            "us-west-2:<your cognito identity pool id>"
17          ]
18        },
19        "ForAnyValue:StringLike": {
20          "cognito-identity.amazonaws.com:amr": [
21            "authenticated",
22            "unauthenticated"
23          ]
24        }
25      }
26    }
27  ]
28}
As you can see, you’re providing the specific cognito identity with permission to assume the role. This can be with anauthorized access — which would be to send events before a user has logged in — or authorized access, which requires a cognito JWT token.
You then give your role permission to send events to pinpoint, by attaching a policy that looks like this:
1{
2	"Version": "2012-10-17",
3	"Statement": [
4      {
5        "Effect": "Allow",
6        "Action": [
7            "mobiletargeting:UpdateEndpoint",
8            "mobiletargeting:PutEvents"
9        ],
10        "Resource": "arn:aws:mobiletargeting:*:${ACCOUNT_ID}:apps/<your pinpoint app ID>*"
11      }
12    ]
13}
This is the part that had me confused for a while: you have to specify both unathenticated and authenticated if you want to be able to send sign up events (because the user hasn’t signed in yet). Also, You will need to attach the IAM role to the cognito identity pool for both authenticated and unauthenticated access. Here’s the Terraform:
1resource "aws_cognito_identity_pool" "users" {
2  identity_pool_name               = "users_identity_pool"
3  allow_unauthenticated_identities = true
4  allow_classic_flow               = true
5
6  cognito_identity_providers {
7    client_id               = aws_cognito_user_pool_client.users.id
8    provider_name           = "cognito-idp.${var.region}.amazonaws.com/${aws_cognito_user_pool.users.id}"
9    server_side_token_check = false
10  }
11
12  supported_login_providers = {}
13
14  saml_provider_arns           = []
15  openid_connect_provider_arns = []
16}
17
18resource "aws_cognito_identity_pool_roles_attachment" "main" {
19  identity_pool_id = aws_cognito_identity_pool.users.id
20
21  roles = {
22    "unauthenticated" = local.identity_pool_role_arn,
23    "authenticated" = local.identity_pool_role_arn
24  }
25}
Something to note about the above. Once your user logs in they will switch from an unauthenticated session to an authenticated session which will change the session ID.
React Setup
I’ll be using the AWS Amplify project to instrument Pinpoint into my frontend code. They provide several useful Javascript libraries for implementing AWS services. If you haven’t heard of Amplify, it’s a framework for developing applications on AWS, similar to Firebase. It’ll get you up and running quickly with AWS infrastructure using Cloudformation. However, I tend to use Terraform for my infrastructure, so I just use the front end libraries they provide.
However, since they intend people to utilize their libraries with Amplify, they can be a bit cagey in the docs with regard to setting it up without Amplify. All of their docs expect you to import the configuration from a file created by the CLI called “aws-exports”, like so:
1import { Amplify, Analytics, Auth } from 'aws-amplify';
2import awsconfig from './aws-exports';
3Amplify.configure(awsconfig);
But I don’t really want to do that. Luckily, I was able to find the full expected configuration in one of the library tests which lead me to this config:
1import { Amplify, Analytics} from 'aws-amplify';
2
3Amplify.configure({
4  Auth: {
5    region: region,
6    userPoolId: cognitoUserPoolId,
7    userPoolWebClientId: cognitoClientId,
8    identityPoolId: awsIdentityPoolId,
9    identityPoolRegion: region
10  },
11  Analytics: {
12    AWSPinpoint: {
13      appId: awsPinpointApplicationId,
14      region: region
15    },
16  }
17});
I won’t get into the userPoolId and userPoolWebClientId — that’s for Cognito user authentication and could easily be a second post. With this set up, I can then run the following in my sign up function:
1import { Analytics } from 'aws-amplify';
2...
3return signUp(values)
4  .then(result => {
5    Analytics.record(signUpEvent({email: values.email}))
6  })
7  .catch(err => {
8    setAuthErrors(handleAuthErrors(err))
9  });
Which uses a defined event function which looks like this:
1export interface EventAttributes {
2 [key: string]: string;
3}
4export interface EventMetrics {
5 [key: string]: number;
6}
7export interface AnalyticsEvent {
8 name: string;
9 attributes?: EventAttributes;
10 metrics?: EventMetrics;
11 immediate?: boolean;
12}
13export const signUpEvent = ({ email }: {email: string}): AnalyticsEvent =>({
14 name: "SignUpEvent",
15 attributes: {
16 email
17 }
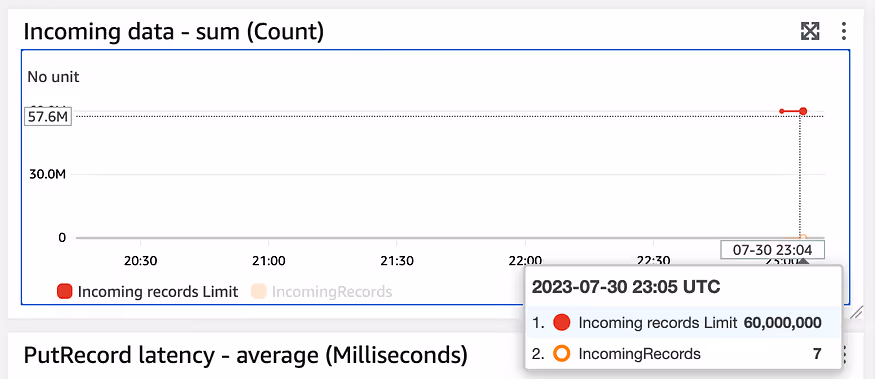
18})Finally, I can see events filtering into the kinesis stream:
Now on to the data pipeline.
Data Pipeline
In order to sent my events from the pinpoint kinesis stream to S3, I’m going to take advantage of Eventbridge Pipes. Pipes allow you to send events to Eventbridge with additional features like filtering on specific event types and event enrichment. This is the serverless part of the setup, so I’ll be using AWS SAM.
You can install sam with Pip or any of the options here. I’ll be using pip and a python virtual environment. First, I’ll create my virtual env, then I’ll install sam into it.
mkvirtualenv pinpoint-event-pipeline
pip install aws-sam-cli
After a lengthy install I’m ready to run sam init --name pinpoint-event-pipeline . Or, if you already have a SAM repo setup you like, go ahead and copy everything over.
Eventbridge Pipes
Eventbridge pipes allow you to filter and enrich events on the way to eventbridge from a variety of source types. One of those source types is a kinesis stream, which is why I chose it for this project.

The following CloudFormation is what I used to create my pipe:
1  Pipe:
2    Type: AWS::Pipes::Pipe
3    Properties:
4      Name: kinesis-to-eventbridge
5      Description: 'Pipe to connect Kinesis stream to EventBridge event bus'
6      RoleArn: !GetAtt PipeRole.Arn
7      Source: !Sub arn:aws:kinesis:us-west-2:${AWS::AccountId}:stream/my-org-app-event-stream-${Environment}
8      SourceParameters:
9        FilterCriteria:
10          Filters:
11            - Pattern: '{"data":{"event_type":["SignUpEvent"]}}'
12            - Pattern: '{"data":{"event_type":["SignInEvent"]}}'
13        KinesisStreamParameters:
14          StartingPosition: LATEST
15          BatchSize: 1
16          DeadLetterConfig:
17            Arn: !GetAtt PipeDLQueue.Arn
18      Target: !Sub 'arn:aws:events:us-west-2:${AWS::AccountId}:event-bus/my-org-events-${Environment}'
19      Enrichment: !GetAtt TransformerLambda.Arn
20      EnrichmentParameters:
21        InputTemplate: '{ "data": <$.data> }'
Obviously, I cut a lot of the template out for brevity, including the code for deploying my “enrichment” lambda as well as DLQ and Pipeline role. The full template can be found here.
In the above Pipe resource, I’ve defined a filter that only allows events that I’ve defined to pass through to my lambda — specifically only the “SignUpEvent” and “SignInEvent” event types I’ve defined. I’ve also defined an enrichment lambda — which I’ve called a “transformer” lambda because I’ll be using it to transform events into the format I’d like to have sent to my backend. At first, I just used the lambda to print the event to get an idea of how the data is shaped when it gets to my lambda, and without much time passing, I can see it in my Cloudwatch logs:

Unfortunately, at this point I hit a wall. I would like to send the event along its way to Eventbridge (see the target of my Eventbridge Pipe). From there I would be able to create a rule which triggers on arrival of sign in/sign up events. Unfortunately, while I’m able to see the events recieved in the Eventbridge metrics — I’m not able create an event rule that triggers. I’m even using the generated schema from Eventbridge’s handy tool which scans your events:

The point of sending the event to event bridge was to create the potential for an event driven approach that would allow me to feed more than one data source from eventbridge. Eventually, if I want to also send data to a realtime database, like Timescale, I would be able to create a second output lambda to route data to that database as well. However, for now my goal is to view my data in Athena. So, instead of routing my event to eventbridge and creating an eventbridge rule to trigger an S3 upload lambda, I’m going to make the lambda the target of my Eventbridge pipe.
This will involve editing the Pipe config like so:
  # Target: !Sub 'arn:aws:events:us-west-2:${AWS::AccountId}:event-bus/museflow-events-${Environment}'
  # for now - just point to the output lambda instead of pushing to eventbridge first.
  Target: !GetAtt PinpointOutputLambda.Arn
There are plenty of tutorials on how to set up a lambda with AWS SAM, so I won’t be going over that here. But, there are some gotchyas in the setting up the event pipe and athena backend. You need to make sure your Pipe has permission invoke each lambda (the validator and the final target), and your lambdas need permission to post to the final S3 buckets which will make up your Athena tables. Your lambda invoke permissions will look like this:
Resources:
  TransformerLambdaInvokePermission:
    Type: 'AWS::Lambda::Permission'
    Properties:
      FunctionName: !GetAtt TransformerLambda.Arn
      Action: 'lambda:InvokeFunction'
      Principal: 'pipes.amazonaws.com'
      SourceAccount: !Ref 'AWS::AccountId'
      SourceArn: !GetAtt Pipe.Arn
  OutputLambdaInvokePermission:
    Type: 'AWS::Lambda::Permission'
    Properties:
      FunctionName: !GetAtt PinpointOutputLambda.Arn
      Action: 'lambda:InvokeFunction'
      Principal: 'pipes.amazonaws.com'
      SourceAccount: !Ref 'AWS::AccountId'
      SourceArn: !GetAtt Pipe.Arn
In addition to the above you’ll want to provide the following permissions to the “output lambda” — or the lambda that your Eventbridge Pipe is targeting:
- Effect: Allow
  Action:
    - s3:PutObject
    - s3:AbortMultipartUpload
  Resource:
    - !Sub 'arn:aws:s3:::museflow-sign-up-events-${Environment}'
    - !Sub 'arn:aws:s3:::museflow-sign-in-events-${Environment}'
Transformation/Validation Lambda
Now, I’ll get a bit into the lambda code. My first lambda has two purposes: Validate the incoming event, and transform the event into a truncated version containing only the necessary pieces. The transformer lambda handler looks like this:
1import urllib.parse
2import os
3import traceback
4from utils.logger import logger
5import json
6from aws_xray_sdk.core import patch_all
7from aws_xray_sdk.core import xray_recorder
8from main.transformer import transform_event
9
10logger.info('Loading function')
11env = os.getenv('Environment', 'local')
12TracingOff = os.getenv('TracingOff', False)
13
14def handler(event, context):
15    log.info(json.dumps(event))
16    log.info(context)
17    env = os.getenv("Environment")
18    s3_endpoint_url =  os.getenv('S3EndpointUrl')
19    region = os.getenv("AWSRegion")
20
21    log.info(f"region: {region}")
22    log.info(f"s3_endpoint_url: {s3_endpoint_url}")
23    validated_events = []
24    for evt in event:
25        try:
26            # print(evt['data']['event_type'])
27            transformed_evt = transform_event(evt)
28            json_dict = json.loads(transformed_evt.model_dump_json())
29            validated_events.append(json_dict)
30        except Exception as e:
31            if env != "local" and not TracingOff:
32                subsegment_ref = xray_recorder.current_subsegment()
33                if subsegment_ref:
34                    subsegment_ref.add_exception(e)
35            log.exception(e)
36            log.error('failed_to_validate_event', evt=json.dumps(evt))
37    try:
38        return validated_events
39    except Exception as e:
40        log.error(e)
41        traceback.print_exc()
42        raise e # re-raise for Lambda console
Each event is run through a transformation function called “transform_evt”. That function looks like this:
1def transform_event(event):
2    if event['data']['event_type'] == 'SignUpEvent':
3        return SignUpEvent(**({
4            "event_type": event['data']['event_type'],
5            "datetime": event['data']['endpoint']['EffectiveDate'],
6            "session_id":  event['data']['session']['session_id'],
7            "email": event['data']['attributes']['email'],
8        }))
9    elif event['data']['event_type'] == 'SignInEvent':
10        return SignInEvent(**({
11            "event_type": event['data']['event_type'],
12            "datetime": event['data']['endpoint']['EffectiveDate'],
13            "session_id":  event['data']['session']['session_id'],
14            "email": event['data']['attributes']['email'],
15            "id": event['data']['attributes']['id'],
16            "is_test_user": event['data']['attributes']['is_test_user'],
17            "user_type": event['data']['attributes']['user_type'],
18        }))
Each event is being validated by its respective Model, which I’ve written using Pydantic, a rather convenient python validator. Something to point out in the above model is that I’m using the “effective date” portion of the event as the timestamp. It seemed as good an option as any.
Here’s the model I’m using for my SignUpEvent:
from pydantic import BaseModel, Extra, EmailStr, field_serializer
from datetime import datetime
from typing import Literal


class SignUpEvent(BaseModel):
    class Config:
        extra = Extra.forbid
    @field_serializer('datetime')
    def serialize_dt(self, dt: datetime, _info):
        return dt.strftime('%Y-%m-%dT%H:%M:%S.%f')[:-3] + 'Z'
    event_type: Literal['SignUpEvent']
    datetime: datetime
    session_id: str
    email: EmailStr
In order for an event to be processed it must conform to the expected schema. Additionally, I’m serializing the date to remove the last 3 0's that get appended to the end when Pydantic prints the date into JSON. Something else to note is that The Amplify library which I’m using to send these events doesn’t accept null values. So, to compensate for that I wrote the following validator, which allows for nulls:
1def coerc_string_to_null( string_val: Any):
2    val = None if string_val == 'null' else string_val
3    return val
4
5class MyClass(BaseModel):
6   ...
7   _my_value_validator = validator('my_value', pre=True, allow_reuse=True)(coerc_string_to_null)
8   my_value: Union[str, None)
“Output” Lambda
Now, we can discuss what I’m calling the “OutputLambda”, which is responsible for taking the validated and transformed event, and sending it to the Athena backend. After this section I’m going to go over actually creating the Athena backend, but for now it should be noted that there is an S3 bucket for each event type. Here’s the handler code for the output lambda (I’ve removed some extraneous code that’s pretty much the same as the last one):
1def get_date_details(datetime_str):
2    dt = datetime.strptime(datetime_str, '%Y-%m-%dT%H:%M:%S.%fZ')
3    return (dt.day, dt.month, dt.year)
4...
5try:
6  s3_client = boto3.client('s3', endpoint_url=s3_endpoint_url)
7  for evt in event:
8      with tempfile.TemporaryDirectory() as temp_dir:
9          id=str(uuid.uuid4())
10          schema = transform_event_schema(evt)
11          parquet_out(evt, schema, f'{temp_dir}/evt_parquet_{id}.parquet')
12          s3_bucket = bucket_map[evt['event_type']]
13          day, month, year = get_date_details(evt['datetime'])
14          s3_put_object(s3_client, s3_bucket, f'year={year}/month={month}/day={day}/{evt["event_type"]}{id}.parquet', f'{temp_dir}/evt_parquet_{id}.parquet')
15  return {
16      "statusCode": 200,
17      "headers": {
18          "Content-Type": "application/json"
19      },
20  }
As you can see I’m calling a new transform function on each event — but this time it’s called transform_event_schema . That’s because I’m taking each event and creating a parquet schema. You can use JSON for Athena, but Parquet is more efficient, which may save you some $$. Here’s the code for my parquet schema generator:
1import pyarrow as pa
2import pyarrow.compute as pc
3
4def transform_event_schema(event):
5    if event['event_type'] == 'SignUpEvent':
6        return pa.schema([
7            ('datetime', pa.timestamp('s', tz='UTC')),
8            ('event_type', pa.string()),
9            ('session_id', pa.string()),
10            ('email', pa.string())
11        ])
12    elif event['event_type'] == 'SignInEvent':
13        return pa.schema([
14            ('datetime', pa.timestamp('s', tz='UTC')),
15            ('event_type', pa.string()),
16            ('session_id', pa.string()),
17            ('email', pa.string()),
18            ('id', pa.string()),
19            ('is_test_user', pa.bool_()),
20            ('user_type', pa.string())
21        ])
It’s a bit verbose and frankly, kind of strangely formatted, but that’s the gist. What isn’t pictured here is an example of an int, for which you might use pa.int64() . You can read more about parquet data types here.
Once my parquet schema is created, I can write it to S3. Unfortunately, I couldn’t easily figure out a way to transform the event into parquet and write directly to S3 from memory, so instead I created a file in a temp directory. It’s important to use a temp directory because Lambdas can potentially use the same context with the same temp. The code I used to write the parquet file looks like this:
1from json2parquet import write_parquet, ingest_data
2
3def parquet_out(json_blob, schema, path):
4    # table = pa.Table.from_pydict(json_array, schema)
5    # pq.write_table(table, path)  # save json/table as parquet
6    date_format = "%Y-%m-%dT%H:%M:%S.%fZ"
7    record_batch=ingest_data([json_blob], schema,date_format=date_format)
8    write_parquet(record_batch, path,compression='snappy', use_deprecated_int96_timestamps=True)
I used a nifty library called json2parquet. The one part that’s worth calling out here is use_depreciated_int96_timestamps=True . From the json2parquet docs:
“If you are using this library to convert JSON data to be read by Spark, Athena, Spectrum or Presto make sure you use use_deprecated_int96_timestamps when writing your Parquet files, otherwise you will see some really screwy dates.”
Fair enough.
The final bit of info worth sharing is that when you write these files to S3 you’ll want to do so in binary. Here’s the function I used to read the parquet file and push it to S3:
1from smart_open import open
2
3def s3_put_object(client, bucket, key, file_path):
4    file = open(file_path, 'rb')
5    content = file.read()
6    tp = {'min_part_size': 5 * 1024**2, 'client': client}
7    uri = f's3://{bucket}/{key}'
8    with open(uri, 'wb', transport_params=tp) as fout:
9        logger.info(f"pushing to s3 {uri}")
10        fout.write(content)
11    file.close()
smart_open is utility library which allows you to read and write from S3 like a native file system using the “open” function. As you can see, I’m specifying b for ‘binary’.
And that’s pretty much it. After deploying, I can go log into my app and watch my function invocation metrics:

And check out their corresponding evens in S3:

You might have also noticed the slightly specific path I chose for these events. This is actually a way that Glue will partition your tables by date automatically (More info in the AWS docs here), which brings us to our next section: Glue/Athena.
Glue/Athena
AWS Glue is a pretty nifty tool with a lot of data-centric features. One thing it works well with is Athena — a Serverless query engine that allows you to query against a multitude of sources, one of which being a Glue table.
In order to create Glue tables based on your S3 data, you’ll need to create what’s called a “Glue Crawler” which will read all of your data in an S3 bucket and place it into a glue table. Now, what’s really nifty about these crawlers is that you don’t even have to create the tables yourself. The crawler will infer the schema of your table based on the format of the data in the S3 bucket. You saw the schemas earlier in my output lambda. So, all you need to do is define an Athena database and one crawler per S3 bucket. Here’s the Terraform I wrote to create them:
1locals {
2  glue_role         = data.aws_iam_role.glue_role.arn
3}
4
5data "aws_iam_role" "glue_role" {
6  name = var.glue_role_name
7}
8
9resource "aws_glue_catalog_database" "this" {
10  name         = var.database_name
11  description  = var.database_description
12  parameters   = var.parameters
13}
14
15resource "aws_glue_crawler" "this" {
16  for_each = var.tables
17  name                   = "${var.database_name}_${each.key}_glue_crawler_${var.environment}"
18  description            = "${var.database_name} glue crawler for table ${each.key} ${var.environment}"
19  database_name          = aws_glue_catalog_database.this.name
20  role                   = local.glue_role
21  schedule               = "cron(0 1 * * ? *)"
22  configuration = jsonencode(
23    {
24      Grouping = {
25        TableGroupingPolicy = "CombineCompatibleSchemas"
26      }
27      CrawlerOutput = {
28        Partitions = { AddOrUpdateBehavior = "InheritFromTable" }
29      }
30      Version = 1
31    }
32  )
33  s3_target {
34    path = each.value.location
35  }
36}
37
38resource "aws_athena_workgroup" "athena" {
39  name = var.aws_athena_workgroup_name
40
41  configuration {
42    enforce_workgroup_configuration    = true
43    publish_cloudwatch_metrics_enabled = true
44
45    result_configuration {
46      output_location = "s3://${var.s3_query_result_bucket_name}/output/"
47
48      encryption_configuration {
49        encryption_option = "SSE_S3"
50      }
51    }
52  }
53}
Not provided above is the config for the S3 Athena query output bucket. Make sure that when you do create the output bucket, you provide a bucket policy that gives access to athena via “athena.amazonaws.com”. For reference, here are the variables I provided to the above template:
1{
2  "environment": "prd",
3  "database_name": "org_name_analytics_prd",
4  "database_description": "org_name athena analytics db",
5  "glue_role_name": "org_name-main-prd-glue-role",
6  "s3_query_result_bucket_name": "org_name-athena-output-prd",
7  "aws_athena_workgroup_name": "org_name-analytics-prd",
8  "tables": {
9    "org_name_sign_in_events": {
10      "description": "org_name app sign in events table prd",
11      "location": "s3://org_name-sign-in-bucket-prd/"
12    },
13    "org_name_sign_up_events": {
14      "description": "org_name app sign in events table prd",
15      "location": "s3://org_name-sign-up-bucket-prd/"
16    }
17  },
18}
In this config each key is the name of a table/crawler. Two things are important to mention. Athena only takes underscores and letters as table names, and you need to end your s3 bucket location with a slash: “/”.
As you can see, I provided a role to be used by the glue crawler. You should make sure that role has permissions to access to each of the S3 buckets you create to hold your parquet events, like so:
1{
2 "Version": "2012-10-17",
3 "Statement": [
4        {
5            "Effect": "Allow",
6            "Action": [
7                "glue:*",
8                "lakeformation:*"
9            ],
10            "Resource": [
11                "*"
12            ]
13        },
14        {
15            "Effect": "Allow",
16            "Action": [
17                "s3:GetObject",
18                "s3:ListBucket"
19            ],
20            "Resource": [
21                "arn:aws:s3:::org_name-sign-up-bucket-prd",
22                "arn:aws:s3:::org_name-sign-up-bucket-prd/*",
23                "arn:aws:s3:::org_name-sign-in-bucket-prd",
24                "arn:aws:s3:::org_name-sign-in-bucket-prd/*"
25            ]
26        }
27    ]
28}
Finally, with all this in place I can visit the Athena console and write a query:

One thing to note is that you should select the correct working group on the top right, because that’s what actually configures the output bucket. Otherwise, you’ll be asked to configure a new one.

Conclusion
This was a fun project. I’ve wanted to set up an Athena pipeline for a while, but never had a good reason. With an easy to create Athena pipeline, I’ll be able to easily and cheaply store data for use in ML, business analytics, or any other analytics I’d like to do.
Some closing thoughts. As you saw in the image of my lambda invocation metrics, this process doesn’t batch at all. That means potentially a single invocation per event. This could potentially get rather costly, so a way to mitigate this might be to place an SQS queue between my event pipe and my lambda. Additionally, Crawlers will re-crawl all of your data daily. This can also be costly, but an alternative might be to use event driven crawlers which would prevent re-crawling of data.
Hope this was an enjoyable and instructive read. If you’d like to follow me for more tech articles, feel free to follow me here or add me on Linkedin: https://www.linkedin.com/in/steven-staley/